[TOC]
一、开篇
本篇是《Spring OAuth2 开发指南》系列文章的第二篇,通过代码实例详细介绍 OAuth2 密码模式的开发细节。网络上关于 OAuth2 开发的代码示范十分多而且杂乱,基本上都是官方手册的摘录搬运,或者过多地受制于框架本身如 Spring Security,约束太多,缺乏系统性,容易造成同学们云里雾里,以至于生搬硬套。
本人主张在开发落地过程中,既不能完全自己造轮子,也不应完全依赖轮子,应该从本质出发,在理清技术原理和细节的条件下,选择适合的方法。从这个原则出发,本文将根据“密码模式的典型架构层次和主要流程”(见《Spring OAuth2 开发指南(一)》)中描述的流程节点,展示其代码实现。另外,文章的要点在于后半部分,提出了资源服务器端鉴权/权限控制,和授权服务器端鉴权/权限控制两种实现方法。
需要注意的是 password 模式由于 OAuth2.1 不推荐使用所以只提供旧的组件代码版本,具体请参见 https://datatracker.ietf.org/doc/html/draft-ietf-oauth-v2-1-02
二、 演示案例
我们继续用相册预览系统(PAPS,Photo Album Preview System)作为演示案例。
PAPS 是一个社交平台的子系统,与 IBCS 类似,采用 RESTful API 对外交互,主要功能是允许用户预览自己的相册,以下是 PAPS 演示项目的必要服务:
| 服务名 | 类别 | 描述 | 技术选型 |
|---|---|---|---|
| photo-service | 内部服务 | 资源服务器角色,相册预览服务 | Spring Boot 开发的 RESTful 服务 |
| idp | 内部服务 | 授权服务器角色,具体指负责认证、授权和鉴权 | Spring Boot 开发 |
| demo-h5 | 外部应用 | demo 应用的前端 | 使用 Postman 代替 |
为此,我们将搭建两个工程项目:photo-service 和 idp,客户端用 Postman 代替。
三、 工程结构
接下来演示两个工程项目的框架代码,这部分代码包含工程的框架结构、Spring Security 和 OAuth2 的基础配置,尽量采用最精简的方式书写。其他项目可以 copy 这部分代码作为基础模板使用。
photo-service 相册服务
- 基础工程结构
src/main
    java
        com.example.demophoto
            config
                oauth2
                    CheckTokenAuthentication.java
                    CheckTokenFilter.java
                    CustomPermissionEvaluator.java
                    CustomRemoteTokenServices.java
                    ResourceServerConfigurer.java
            service
                PermisionEvaluatingService.java
            web
                PhotoController.java
            DemoPhotoApplication.java
    resources
        applicaton.yaml
- pom.xml
<?xml version="1.0" encoding="UTF-8"?>
<project xmlns="http://maven.apache.org/POM/4.0.0" xmlns:xsi="http://www.w3.org/2001/XMLSchema-instance"
         xsi:schemaLocation="http://maven.apache.org/POM/4.0.0 https://maven.apache.org/xsd/maven-4.0.0.xsd">
    <modelVersion>4.0.0</modelVersion>
    <parent>
        <groupId>org.springframework.boot</groupId>
        <artifactId>spring-boot-starter-parent</artifactId>
        <version>2.3.4.RELEASE</version>
        <relativePath/> <!-- lookup parent from repository -->
    </parent>
    <groupId>com.example</groupId>
    <artifactId>oauth2-demo-1a-photo-service</artifactId>
    <version>0.0.1-SNAPSHOT</version>
    <name>oauth2-demo-1a-photo-service</name>
    <description>oauth2-demo-1a-photo-service</description>
    <properties>
        <java.version>1.8</java.version>
    </properties>

    <dependencies>
        <dependency>
            <groupId>org.springframework.boot</groupId>
            <artifactId>spring-boot-starter</artifactId>
        </dependency>

        <dependency>
            <groupId>org.springframework.boot</groupId>
            <artifactId>spring-boot-starter-web</artifactId>
        </dependency>

        <!-- https://mvnrepository.com/artifact/org.springframework.security.oauth.boot/spring-security-oauth2-autoconfigure -->
        <dependency>
            <groupId>org.springframework.security.oauth.boot</groupId>
            <artifactId>spring-security-oauth2-autoconfigure</artifactId>
            <version>2.1.2.RELEASE</version>
        </dependency>
    </dependencies>

    <build>
        <plugins>
            <plugin>
                <groupId>org.springframework.boot</groupId>
                <artifactId>spring-boot-maven-plugin</artifactId>
            </plugin>
        </plugins>
    </build>

</project>
- applicaton.yaml
server:
  port: 8010

security:
  oauth2:
    client:
      clientId: client2
      clientSecret: client2p
    resource:
      tokenInfoUri: http://127.0.0.1:8000/oauth/check_token
- ResourceServerConfigurer.java
package com.example.demophoto.config.oauth2;

import org.springframework.context.annotation.Configuration;
import org.springframework.security.config.annotation.web.builders.HttpSecurity;
import org.springframework.security.oauth2.config.annotation.web.configuration.EnableResourceServer;
import org.springframework.security.oauth2.config.annotation.web.configuration.ResourceServerConfigurerAdapter;
import org.springframework.security.oauth2.config.annotation.web.configurers.ResourceServerSecurityConfigurer;

@Configuration
@EnableResourceServer
public class ResourceServerConfigurer extends ResourceServerConfigurerAdapter {
    /**
     * spring-security-oauth2 组件一般性配置
     *
     * @param resources
     */
    @Override
    public void configure(ResourceServerSecurityConfigurer resources) {
        resources.resourceId("demo-1");
    }

    /**
     * spring-security-oauth2 组件一般性配置
     *
     * @param http
     * @throws Exception
     */
    @Override
    public void configure(HttpSecurity http) throws Exception {
        http.authorizeRequests()
                .anyRequest().authenticated();
    }
}
idp 授权服务
- 基础工程结构
src/main
    java
        com.example.demoidp
            config
                oauth2
                    AuthorizationServerConfigurer.java
                    CheckTokenInterceptor.java
                    WebSecurityConfig.java
            service
                业务逻辑,如鉴权逻辑
            DemoIdpApplication.java
    resources
        applicaton.yaml
- pom.xml
<?xml version="1.0" encoding="UTF-8"?>
<project xmlns="http://maven.apache.org/POM/4.0.0" xmlns:xsi="http://www.w3.org/2001/XMLSchema-instance"
         xsi:schemaLocation="http://maven.apache.org/POM/4.0.0 https://maven.apache.org/xsd/maven-4.0.0.xsd">
    <modelVersion>4.0.0</modelVersion>
    <parent>
        <groupId>org.springframework.boot</groupId>
        <artifactId>spring-boot-starter-parent</artifactId>
        <version>2.3.4.RELEASE</version>
        <relativePath/> <!-- lookup parent from repository -->
    </parent>
    <groupId>com.example</groupId>
    <artifactId>oauth2-demo-1a-idp</artifactId>
    <version>0.0.1-SNAPSHOT</version>
    <name>oauth2-demo-1a-idp</name>
    <description>oauth2-demo-1a-idp</description>
    <properties>
        <java.version>1.8</java.version>
    </properties>

    <dependencies>
        <dependency>
            <groupId>org.springframework.boot</groupId>
            <artifactId>spring-boot-starter</artifactId>
        </dependency>

        <dependency>
            <groupId>org.springframework.boot</groupId>
            <artifactId>spring-boot-starter-web</artifactId>
        </dependency>

        <!-- https://mvnrepository.com/artifact/org.springframework.security.oauth/spring-security-oauth2 -->
        <dependency>
            <groupId>org.springframework.security.oauth</groupId>
            <artifactId>spring-security-oauth2</artifactId>
            <version>2.3.8.RELEASE</version>
        </dependency>
    </dependencies>

    <build>
        <plugins>
            <plugin>
                <groupId>org.springframework.boot</groupId>
                <artifactId>spring-boot-maven-plugin</artifactId>
            </plugin>
        </plugins>
    </build>

</project>
- applicaton.yaml
server:
  port: 8000
- AuthorizationServerConfigurer.java
package com.example.demoidp.config.oauth2;

import org.springframework.beans.factory.annotation.Autowired;
import org.springframework.context.annotation.Bean;
import org.springframework.context.annotation.Configuration;
import org.springframework.security.authentication.AuthenticationManager;
import org.springframework.security.crypto.factory.PasswordEncoderFactories;
import org.springframework.security.crypto.password.PasswordEncoder;
import org.springframework.security.oauth2.config.annotation.web.configuration.AuthorizationServerConfigurerAdapter;
import org.springframework.security.oauth2.config.annotation.web.configuration.EnableAuthorizationServer;
import org.springframework.security.oauth2.config.annotation.web.configurers.AuthorizationServerEndpointsConfigurer;
import org.springframework.security.oauth2.config.annotation.web.configurers.AuthorizationServerSecurityConfigurer;

@Configuration
@EnableAuthorizationServer
public class AuthorizationServerConfigurer extends AuthorizationServerConfigurerAdapter {
    private AuthenticationManager authenticationManager;

    /**
     * spring-security-oauth2 组件一般性配置
     *
     * @param authenticationManager
     */
    @Autowired
    public AuthorizationServerConfigurer(AuthenticationManager authenticationManager) {
        this.authenticationManager = authenticationManager;
    }

    /**
     * 配置密码加密方法
     */
    @Bean
    PasswordEncoder passwordEncoder() {
        return PasswordEncoderFactories.createDelegatingPasswordEncoder();
    }

    /**
     * spring-security-oauth2 组件一般性配置
     *
     * @param endpoints
     */
    @Override
    public void configure(AuthorizationServerEndpointsConfigurer endpoints) {
        endpoints.authenticationManager(authenticationManager);
    }

    /**
     * spring-security-oauth2 组件一般性配置
     *
     * @param security
     */
    @Override
    public void configure(AuthorizationServerSecurityConfigurer security) {
        security
                // /oauth/check_token 请求放行
                .checkTokenAccess("permitAll()")
                .passwordEncoder(passwordEncoder());
    }
}
- WebSecurityConfig.java
package com.example.demoidp.config.oauth2;

import org.springframework.context.annotation.Bean;
import org.springframework.context.annotation.Configuration;
import org.springframework.security.authentication.AuthenticationManager;
import org.springframework.security.config.annotation.web.configuration.EnableWebSecurity;
import org.springframework.security.config.annotation.web.configuration.WebSecurityConfigurerAdapter;

@Configuration
@EnableWebSecurity
public class WebSecurityConfig extends WebSecurityConfigurerAdapter {
    /**
     * spring-security-oauth2 组件一般性配置
     *
     * @return AuthenticationManager
     * @throws Exception
     */
    @Bean
    @Override
    public AuthenticationManager authenticationManagerBean() throws Exception {
        return super.authenticationManagerBean();
    }
}
四、 代码实现
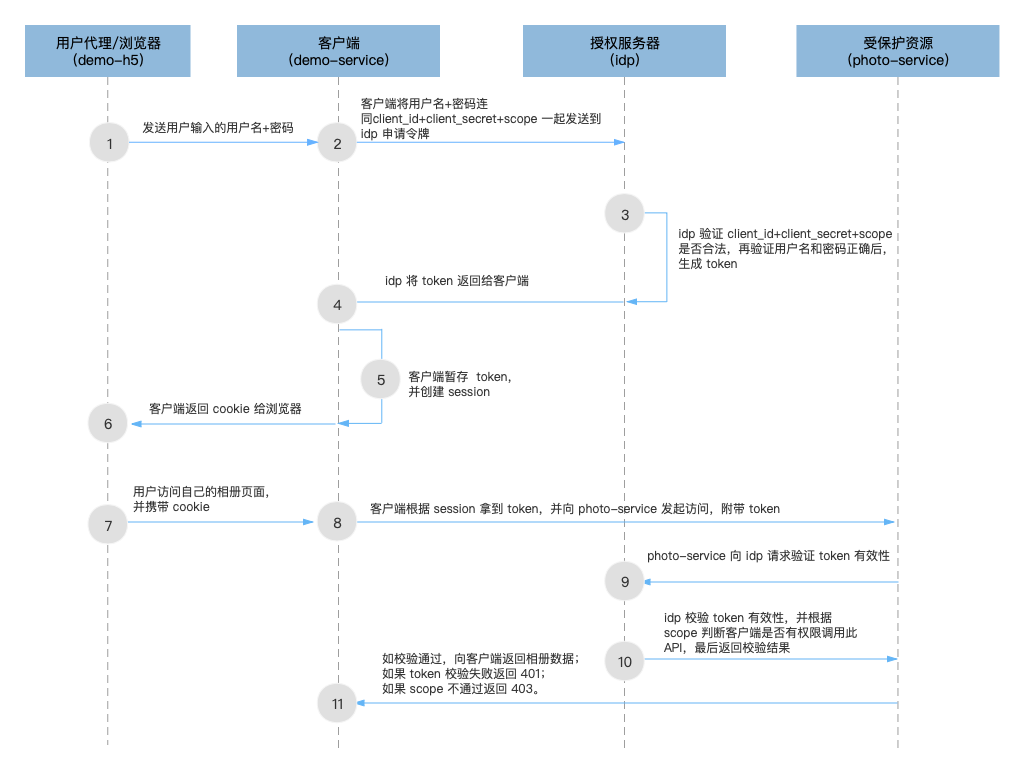
如图所示,是密码模式的最精简架构层次和主要流程。下面我们逐步实现该流程:
一)第一阶段:认证授权阶段
1)用户代理(demo-h5)将用户输入的用户名和密码,发送给客户端(demo-service)
此步骤我们使用 Postman 执行,这里不展开介绍。
2)客户端(demo-service)将用户输入的用户名和密码,连同 client_id + client_secret (由 idp 分配)一起发送到 idp 以请求令牌,如果 idp 约定了 scope 则还需要带上 scope 参数
此步骤我们使用 Postman 执行,这里不展开介绍。需要注意的是,Postman 在这里仍然是一个 client 角色,client_id 代表的是它自己。请求的 URL 为:
POST http://127.0.0.1:8000/oauth/token
3)idp 首先验证 client_id + client_secret 的合法性,再检查 scope 是否无误,最后验证用户名和密码是否正确,正确则生成 token。这一步也叫“认证”
为了实现这个步骤,我们在 idp 工程的 AuthorizationServerConfigurer 类中加入以下代码:
- 首先是 client_id + client_secret + scope 的校验
@Configuration
@EnableAuthorizationServer
public class AuthorizationServerConfigurer extends AuthorizationServerConfigurerAdapter {

    ...

    /**
     * 3. [密码模式的典型架构层次和主要流程] 中的第 3 步:
     *    idp 首先验证 client_id + client_secret 的合法性,再检查 scope 是否无误
     *
     *    PS: 这里为演示方便,就地创建了账号,生产环境应自行替换成数据库查询等方式
     */
    private class MockJDBCClientDetailsService implements ClientDetailsService {
        @Override
        public ClientDetails loadClientByClientId(String clientId) throws ClientRegistrationException {
            /**
             * GrantedAuthority 与 hasAuthority() 关联
             */
            Set<GrantedAuthority> authorities = new HashSet<>();
            authorities.add(new SimpleGrantedAuthority("READ"));
            authorities.add(new SimpleGrantedAuthority("WRITE"));

            BaseClientDetails details1 = new BaseClientDetails();
            details1.setClientId("client1");
            details1.setClientSecret(passwordEncoder().encode("client1p"));
            details1.setAuthorizedGrantTypes(Arrays.asList("password"));
            details1.setScope(Arrays.asList("resource:write", "resource:read"));
            details1.setResourceIds(Arrays.asList("demo-1"));
            details1.setAuthorities(authorities);

            BaseClientDetails details2 = new BaseClientDetails();
            details2.setClientId("client2");
            details2.setClientSecret(passwordEncoder().encode("client2p"));
            details2.setAuthorizedGrantTypes(Arrays.asList("client_credentials"));
            details2.setScope(Arrays.asList("resource:write", "resource:read"));
            details2.setResourceIds(Arrays.asList("demo-1"));
            details2.setAuthorities(authorities);

            BaseClientDetails details3 = new BaseClientDetails();
            details3.setClientId("client3");
            details3.setClientSecret(passwordEncoder().encode("client3p"));
            details3.setAuthorizedGrantTypes(Arrays.asList("password"));
            details3.setScope(Arrays.asList("resource:write", "resource:read"));
            details3.setResourceIds(Arrays.asList("demo-1"));
            details3.setAuthorities(authorities);

            Map<String, ClientDetails> clients = new HashMap<>();
            clients.put("client1", details1);
            clients.put("client2", details2);
            clients.put("client3", details3);

            if (!clients.containsKey(clientId)) {
                throw new ClientRegistrationException("Client not found");
            }

            return clients.get(clientId);
        }
    }

    /**
     * spring-security-oauth2 组件一般性配置
     * 配置自定义 ClientDetails
     *
     * @param clients
     * @throws Exception
     */
    @Override
    public void configure(ClientDetailsServiceConfigurer clients) throws Exception {
        clients.withClientDetails(new MockJDBCClientDetailsService());
    }

    ...
}
- 然后是用户名和密码的校验
@Configuration
@EnableWebSecurity
public class WebSecurityConfig extends WebSecurityConfigurerAdapter {
    /**
     * 3. [密码模式的典型架构层次和主要流程] 中的第 3 步:
     *    验证用户名和密码是否正确,正确则生成 token
     *
     *    PS: 这里为演示方便,就地创建了账号,生产环境应自行替换成数据库查询等方式
     */
    private class MockJDBCUserDeatilsService implements UserDetailsService {
        @Override
        public UserDetails loadUserByUsername(String username) throws UsernameNotFoundException {
            Map<String, String> users = new HashMap<>();
            users.put("user1", "pwd1");
            users.put("user2", "pwd2");

            if (!users.containsKey(username)) {
                throw new UsernameNotFoundException("User not found");
            }

            return User.withDefaultPasswordEncoder()
                    .username(username)
                    .password(users.get(username))
                    .roles("USER")
                    .build();
        }
    }

    @Bean
    @Override
    public UserDetailsService userDetailsService() {
        return new MockJDBCUserDeatilsService();
    }
}
当 client_id + client_secret + scope,以及用户名和密码都校验通过后,spring-security-oauth2 会调用合适的 tokenServices 生成 token。有兴趣的同学可以自行查阅源代码追踪整个过程,这里介绍源码追踪的入口方法:
我们知道 demo-h5 客户端(Postman)首先向 http://127.0.0.1:8000/oauth/token 发起请求,因此我们找到 spring-security-oauth2 组件源码中的 /oauth/token 端点,具体路径为:
org.springframework.security.oauth2.provider.endpoint.TokenEndpoint.postAccessToken()
4)idp 返回认证结果给客户端,认证通过返回 token,认证失败返回 401。如果认证成功则此步骤也叫“授权”
这一步 spring-security-oauth2 已经为我们处理好了,不需要额外处理。想要追踪源码过程的同学,可参考上一步骤介绍的入口方法。
5)客户端收到 token 后进行暂存,并创建对应的 session
这个步骤通过 Postman 演示(直接复制返回的 token 字符串即可),这里不展开介绍。
6)客户端颁发 cookie 给用户代理/浏览器
这个步骤通过 Postman 演示,这里不展开介绍。
二)第二阶段:授权后请求资源阶段
7)用户通过用户代理(demo-h5)访问“我的相册”页面,用户代理携带 cookie 向客户端(demo—service)发起请求
此步骤使用 Postman 执行,不展开叙述。
8)客户端通过 session 找到对应的 token,携带此 token 向资源服务器(photo-service)发起请求
此步骤使用 Postman 执行,我们将第 5) 步获取的 token 作为 Bearer Token,向 photo-service 发起请求,请求的 URL 为:
GET http://127.0.0.1:8010/api/photo

该请求只需要携带 token 即可,不需要其他参数
9)资源服务器(photo-service)向 idp 请求验证 token 有效性
在介绍如何处理请求前,我们先在 photo-service 工程中新增相关代码:
- PhotoController.java
package com.example.demophoto.web;

import org.springframework.web.bind.annotation.GetMapping;
import org.springframework.web.bind.annotation.RequestMapping;
import org.springframework.web.bind.annotation.RestController;

@RestController
@RequestMapping("/api/")
public class PhotoController {
    @GetMapping("/photo")
    public String fetchPhoto() {
        return "GET photo";
    }
}
此外,还有几个关键配置:
- ResourceServerConfigurerAdapter.configure(HttpSecurity http) 方法配置了 http.authorizeRequests().anyRequest().authenticated() 使得所有请求都要先鉴权;
- application.yaml 中配置了 client_id、client_secret 和 resource.tokenInfoUri,当资源服务接受到请求时,会携带 token 向 tokenInfoUri 指定的地址发起鉴权请求。
默认情况下,当 demo-h5 向 photo-service 发起资源访问的请求时,photo-service 会将获取的 token 发到 idp 进行校验,在这个过程中 spring-security-oauth2 不会对 scope 做任何处理。我们知道 scope 是用来约束 client 的权限范围的,因此 scope 权限检查(也视为鉴权的工作之一)这个工作需要自己编码实现。
通常来说,scope 权限检查的业务逻辑可以灵活设定,甚至可以忽略它。本文介绍两种 scope 检查的实现方法:
- 资源服务器端检查;
- 授权服务器端检查。
接下来的第 10) 步将拆分成两种方式,分别对此进行介绍。
10)【方式一:资源服务器端 scope 检查】 idp 校验 token 有效性,资源服务器校验 scope
idp 校验 token 有效性,通过则返回 client 相关信息(包含 scope )给 photo-service,photo-service 再根据 scope 判断客户端(demo-h5)是否有权限调用此 API,如通过检查则继续下一步骤,否则返回 403 错误给 demo-h5。这一步也叫“鉴权”
我们在 photo-service 工程中添加以下代码:
- ResourceServerConfigurer.java
@Configuration
@EnableResourceServer
public class ResourceServerConfigurer extends ResourceServerConfigurerAdapter {
    ...

    @Override
    public void configure(HttpSecurity http) throws Exception {
        http.authorizeRequests()
                .antMatchers("/api/photo/**").access("#oauth2.hasScope('resource:read')")
                .antMatchers("/api/photo2/**").access("#oauth2.hasScope('resource:read')")
                .antMatchers("/api/photo3/**").access("#oauth2.hasScope('resource:write')")
                .anyRequest().authenticated();
    }

    ...
}
通过 access(“#oauth2.hasScope(‘resource:write’)”) 方法可以实现资源服务器端的 scope 检查。其主要流程为:
- photo-service 收到客户端请求后,将获取到的 token 发往 idp 校验;
- idp 校验通过后,将 clientDetails 信息返回给 photo-service,其中就包括 scope 参数;
- photo-service 拿到 scope 后,根据 access(“#oauth2.hasScope(‘resource:write’)”) 判断该请求是否在 scope 范围内。
10)【方式二:idp 端 scope 检查】 idp 校验 token + scope 有效性
idp 校验 token 有效性,再根据 scope 判断客户端(demo-h5)是否有权限调用此 API,最后返回校验结果给资源服务器。由于 spring-security-oauth2 本身没有处理 scope 检查,且默认情况下,photo-service 向 idp 请求 token 鉴权时,并未携带任何其他请求信息,因此 idp 无法知道本次请求的细节,因此无法执行 socpe 检查。
所以重点有两个:一是 photo-service 向 idp 请求 token 鉴权的同时如何携带请求的细节(比如访问的是什么资源?请求的是哪个API?);二是如何拦截 token 鉴权过程使得 scope 校验失败是返回 403 错误?
当然实现这个目的,有很多方法,本文采用了比较直观的方法:利用 Filter。
我们在 photo-service 工程中添加以下代码:
- ResourceServerConfigurer.java
package com.example.demophoto.config.oauth2;

import org.springframework.beans.factory.annotation.Autowired;
import org.springframework.boot.autoconfigure.security.oauth2.resource.ResourceServerProperties;
import org.springframework.context.annotation.Configuration;
import org.springframework.security.config.annotation.web.builders.HttpSecurity;
import org.springframework.security.oauth2.config.annotation.web.configuration.EnableResourceServer;
import org.springframework.security.oauth2.config.annotation.web.configuration.ResourceServerConfigurerAdapter;
import org.springframework.security.oauth2.config.annotation.web.configurers.ResourceServerSecurityConfigurer;
import org.springframework.security.web.authentication.preauth.AbstractPreAuthenticatedProcessingFilter;

@Configuration
@EnableResourceServer
public class ResourceServerConfigurer extends ResourceServerConfigurerAdapter {
    private final ResourceServerProperties resource;

    @Autowired
    protected ResourceServerConfigurer(ResourceServerProperties resource) {
        this.resource = resource;
    }

    /**
     * 自定义 RemoteTokenServices 以取代资源服务器默认使用的
     * RemoteTokenServices 向 IDP 发起 /oauth/check_token 鉴权请求
     *
     * @return
     */
    public CustomRemoteTokenServices customRemoteTokenServices() {
        CustomRemoteTokenServices services = new CustomRemoteTokenServices();
        services.setCheckTokenEndpointUrl(this.resource.getTokenInfoUri());
        services.setClientId(this.resource.getClientId());
        services.setClientSecret(this.resource.getClientSecret());
        return services;
    }

    @Override
    public void configure(ResourceServerSecurityConfigurer resources) {
        resources.resourceId("demo-1")
                .tokenServices(customRemoteTokenServices());
    }

    @Override
    public void configure(HttpSecurity http) throws Exception {
        http.addFilterBefore(new CheckTokenFilter(), AbstractPreAuthenticatedProcessingFilter.class);
        http.authorizeRequests()
                .antMatchers("/api/photo/**").access("#oauth2.hasScope('resource:read')")
                .antMatchers("/api/photo2/**").access("#oauth2.hasScope('resource:read')")
                .antMatchers("/api/photo3/**").access("#oauth2.hasScope('resource:write')")
                .anyRequest().authenticated();
    }
}
- CheckTokenFilter.java
package com.example.demophoto.config.oauth2;

import org.springframework.security.core.context.SecurityContext;
import org.springframework.security.core.context.SecurityContextHolder;

import javax.servlet.*;
import javax.servlet.http.HttpServletRequest;
import java.io.IOException;
import java.util.HashMap;
import java.util.Map;

/**
 * 在向 IDP 发起 /oauth/check_token 请求前,将请求细节存储到 SecurityContext 中,
 * 以便 CustomRemoteTokenServices.loadAuthentication() 可以获取到该请求细节
 */
public class CheckTokenFilter implements Filter {
    @Override
    public void doFilter(ServletRequest req, ServletResponse res, FilterChain chain) throws IOException,
            ServletException {
        HttpServletRequest request = (HttpServletRequest) req;

        String uri = request.getRequestURI();
        String method = request.getMethod();

        /**
         * 仅处理 /api/**
         */
        if (!uri.startsWith("/api/")) {
            chain.doFilter(req, res);
            return;
        }

        SecurityContext sc = SecurityContextHolder.getContext();
        CheckTokenAuthentication authentication = (CheckTokenAuthentication) sc.getAuthentication();

        if (authentication == null) {
            authentication = new CheckTokenAuthentication(null);
        }

        /**
         * 将用户代理或其他服务请求访问本资源服务器的细节(此处为 HTTP-Method + URI)
         * 存储到 SecurityContext 的 authentication 对象中
         */
        Map<String, Object> details = new HashMap<>();
        details.put("uri", uri);
        details.put("method", method);

        authentication.setDetails(details);
        sc.setAuthentication(authentication);

        chain.doFilter(req, res);
    }
}
- CustomRemoteTokenServices.java
package com.example.demophoto.config.oauth2;

import org.apache.commons.logging.Log;
import org.apache.commons.logging.LogFactory;
import org.springframework.http.*;
import org.springframework.http.client.ClientHttpResponse;
import org.springframework.security.access.AccessDeniedException;
import org.springframework.security.core.Authentication;
import org.springframework.security.core.AuthenticationException;
import org.springframework.security.core.context.SecurityContextHolder;
import org.springframework.security.crypto.codec.Base64;
import org.springframework.security.oauth2.client.resource.OAuth2AccessDeniedException;
import org.springframework.security.oauth2.common.OAuth2AccessToken;
import org.springframework.security.oauth2.common.exceptions.InvalidTokenException;
import org.springframework.security.oauth2.provider.OAuth2Authentication;
import org.springframework.security.oauth2.provider.token.AccessTokenConverter;
import org.springframework.security.oauth2.provider.token.DefaultAccessTokenConverter;
import org.springframework.security.oauth2.provider.token.ResourceServerTokenServices;
import org.springframework.util.LinkedMultiValueMap;
import org.springframework.util.MultiValueMap;
import org.springframework.web.client.DefaultResponseErrorHandler;
import org.springframework.web.client.RestOperations;
import org.springframework.web.client.RestTemplate;

import java.io.IOException;
import java.io.UnsupportedEncodingException;
import java.util.HashMap;
import java.util.Map;

/**
 * 以 RemoteTokenServices 为模板
 * 基本思路是在向 IDP 发起 /oauth/check_token 的请求中,
 * 添加用户代理或其他服务请求访问本资源服务器的 API 的细节,
 * 以便 IDP 可以判断该用户代理或其他服务(即 client)是否可以调用此 API
 * <p>
 * (PS:也可以由 IDP 返回 ClientDetails 给资源服务,由资源服务处理放行逻辑)
 */
public class CustomRemoteTokenServices implements ResourceServerTokenServices {

    protected final Log logger = LogFactory.getLog(getClass());

    private RestOperations restTemplate;

    private String checkTokenEndpointUrl;

    private String clientId;

    private String clientSecret;

    private String tokenName = "token";

    /**
     * 与 IDP 约定的存储 API 请求细节的参数
     */
    private String reqPayload = "payload";

    private AccessTokenConverter tokenConverter = new DefaultAccessTokenConverter();

    public CustomRemoteTokenServices() {
        restTemplate = new RestTemplate();
        ((RestTemplate) restTemplate).setErrorHandler(new DefaultResponseErrorHandler() {
            @Override
            // Ignore 400
            public void handleError(ClientHttpResponse response) throws IOException {
                Integer statusCode = response.getRawStatusCode();
                if (statusCode != 400) {
                    if (statusCode == 401 || statusCode == 403) {
                        HttpStatus status = HttpStatus.resolve(statusCode);
                        throw new AccessDeniedException(status.toString());
                    }
                    super.handleError(response);
                }
            }
        });
    }

    public void setRestTemplate(RestOperations restTemplate) {
        this.restTemplate = restTemplate;
    }

    public void setCheckTokenEndpointUrl(String checkTokenEndpointUrl) {
        this.checkTokenEndpointUrl = checkTokenEndpointUrl;
    }

    public void setClientId(String clientId) {
        this.clientId = clientId;
    }

    public void setClientSecret(String clientSecret) {
        this.clientSecret = clientSecret;
    }

    public void setAccessTokenConverter(AccessTokenConverter accessTokenConverter) {
        this.tokenConverter = accessTokenConverter;
    }

    public void setTokenName(String tokenName) {
        this.tokenName = tokenName;
    }

    /**
     * 当使用自定义的 tokenServices 替换默认的 tokenServices 后,
     * 原来流程中的第 9 步就变成由该方法执行。
     *
     * 9. [密码模式的典型架构层次和主要流程] 中的第 9 步:
     * 资源服务器(photo-service)向 idp 请求验证 token 有效性
     *
     * @param accessToken
     * @return
     * @throws AuthenticationException
     * @throws InvalidTokenException
     */
    @Override
    public OAuth2Authentication loadAuthentication(String accessToken) throws AuthenticationException, InvalidTokenException {
        Map<String, Object> authDetails = new HashMap<>();

        /**
         * 取得在 CheckTokenFilter 过滤器中置入的 API 请求细节
         */
        Authentication authentication = SecurityContextHolder.getContext().getAuthentication();
        if (authentication != null) {
            authDetails = (Map<String, Object>) authentication.getDetails();
        }

        MultiValueMap<String, String> formData = new LinkedMultiValueMap<>();
        formData.add(tokenName, accessToken);
        if (!authDetails.isEmpty()) {
            formData.add(reqPayload, authDetails.get("method") + " " + authDetails.get("uri"));
        }
        HttpHeaders headers = new HttpHeaders();
        headers.set("Authorization", getAuthorizationHeader(clientId, clientSecret));

        Map<String, Object> map = postForMap(checkTokenEndpointUrl, formData, headers);

        /**
         * 11. [密码模式的典型架构层次和主要流程] 中的第 11 步:
         *     如果 token 校验失败则返回 401 给客户端,如果 scope 检查不通过则返回 403
         */
        if (map.containsKey("error")) {
            if (logger.isDebugEnabled()) {
                logger.debug("check_token returned error: " + map.get("error"));
            }
            if (map.containsKey("status")) {
                if ("403".equals(map.get("status").toString())) {
                    throw new OAuth2AccessDeniedException(map.get("error").toString());
                }
            }
            throw new InvalidTokenException(accessToken);
        }

        // gh-838
        if (map.containsKey("active") && !"true".equals(String.valueOf(map.get("active")))) {
            logger.debug("check_token returned active attribute: " + map.get("active"));
            throw new InvalidTokenException(accessToken);
        }

        return tokenConverter.extractAuthentication(map);
    }

    @Override
    public OAuth2AccessToken readAccessToken(String accessToken) {
        throw new UnsupportedOperationException("Not supported: read access token");
    }

    private String getAuthorizationHeader(String clientId, String clientSecret) {

        if (clientId == null || clientSecret == null) {
            logger.warn("Null Client ID or Client Secret detected. Endpoint that requires authentication will reject request with 401 error.");
        }

        String creds = String.format("%s:%s", clientId, clientSecret);
        try {
            return "Basic " + new String(Base64.encode(creds.getBytes("UTF-8")));
        } catch (UnsupportedEncodingException e) {
            throw new IllegalStateException("Could not convert String");
        }
    }

    private Map<String, Object> postForMap(String path, MultiValueMap<String, String> formData, HttpHeaders headers) {
        if (headers.getContentType() == null) {
            headers.setContentType(MediaType.APPLICATION_FORM_URLENCODED);
        }
        @SuppressWarnings("rawtypes")
        Map<String, Object> result = new HashMap<>();
        try {
            Map map = restTemplate.exchange(path, HttpMethod.POST,
                    new HttpEntity<MultiValueMap<String, String>>(formData, headers), Map.class).getBody();
                    result = map;
        }
        catch (Exception e) {
            logger.error(e.getMessage());
        }

        return result;
    }

}
- CheckTokenAuthentication.java
package com.example.demophoto.config.oauth2;

import org.springframework.security.authentication.AbstractAuthenticationToken;
import org.springframework.security.core.GrantedAuthority;

import java.util.Collection;

public class CheckTokenAuthentication extends AbstractAuthenticationToken {

    /**
     * Creates a token with the supplied array of authorities.
     *
     * @param authorities the collection of <tt>GrantedAuthority</tt>s for the principal
     *                    represented by this authentication object.
     */
    public CheckTokenAuthentication(Collection<? extends GrantedAuthority> authorities) {
        super(authorities);
    }

    @Override
    public Object getCredentials() {
        return null;
    }

    @Override
    public Object getPrincipal() {
        return null;
    }
}
接着在 idp 工程中添加以下代码:
- AuthorizationServerConfigurer.java
@Configuration
@EnableAuthorizationServer
public class AuthorizationServerConfigurer extends AuthorizationServerConfigurerAdapter {
    ...

    @Override
    public void configure(AuthorizationServerEndpointsConfigurer endpoints) {
        endpoints.authenticationManager(authenticationManager)

                // 通过插入 interceptor 来实现自定义的鉴权方法
                .addInterceptor(new CheckTokenInterceptor(endpoints.getTokenStore()));
    }

    ...
}
- CheckTokenInterceptor.java
package com.example.demoidp.config.oauth2;

import org.springframework.security.access.AccessDeniedException;
import org.springframework.security.oauth2.provider.OAuth2Authentication;
import org.springframework.security.oauth2.provider.OAuth2Request;
import org.springframework.security.oauth2.provider.token.TokenStore;
import org.springframework.util.StringUtils;
import org.springframework.web.servlet.HandlerInterceptor;

import javax.servlet.http.HttpServletRequest;
import javax.servlet.http.HttpServletResponse;
import java.util.HashMap;
import java.util.Map;

/**
 * /oauth/check_token 校验 token 请求拦截器
 */
public class CheckTokenInterceptor implements HandlerInterceptor {
    private String TOKEN_NAME = "token";
    private final String TOKEN_INFO_URI = "/oauth/check_token";

    private TokenStore tokenStore;

    public CheckTokenInterceptor(TokenStore tokenStore) {
        this.tokenStore = tokenStore;
    }

    // for test only
    private final Map<String, String> clientScopes = new HashMap<String, String>() {
        {
            put("client1[resource:read]", "GET /api/photo");
            put("client1[resource:write]", "POST /api/photo");
            put("client2[resource:read]", "GET /api/photo2");
            put("client2[resource:write]", "POST /api/photo2");
            put("client3[resource:read]", "GET /api/photo3");
            put("client3[resource:write]", "POST /api/photo3");
        }
    };

    /**
     * 10. [密码模式的典型架构层次和主要流程] 中的第 10 步:
     *     idp 校验 token 有效性和 scope 权限
     * <p>
     * 即 IDP 根据 scope 判断客户端(demo-service)
     * 是否有权限调用此 API,最后返回校验结果给资源服务器
     */
    @Override
    public boolean preHandle(HttpServletRequest request, HttpServletResponse response, Object handler) throws Exception {
        String uri = request.getRequestURI();

        /**
         * 仅拦截 /oauth/check_token
         */
        if (!TOKEN_INFO_URI.equals(uri)) {
            return true;
        }

        /**
         * payload 是 IDP 和资源服务器角色约定的传参格式
         * 即 client 请求访问资源服务器的 API 的细节
         * 可要求必须携带 payload
         *
         * 此部分可根据业务逻辑自行处理
         */
        String paylad = request.getParameter("payload");
        if (StringUtils.isEmpty(paylad)) {
            throw new AccessDeniedException("insufficient_payload");
        }

        if ("GET /error".equals(paylad)) {
            return true;
        }

        /**
         * 10. [密码模式的典型架构层次和主要流程] 中的第 10 步:
         * 【方式二:idp 端 scope 检查】 idp 校验 token + scope 有效性
         *
         * 根据 token 查得 clientId,再根据 scope 检查该 client 是否有权限调用此 API
         * 此部分可根据业务逻辑自行处理,比如从数据库中查询 client、API 和 scope 的关系
         */
        String token = request.getParameter(TOKEN_NAME);
        OAuth2Authentication oAuth2Authentication = tokenStore.readAuthentication(token);
        OAuth2Request oAuth2Request = oAuth2Authentication.getOAuth2Request();
        String scopeKey = oAuth2Request.getClientId() + oAuth2Request.getScope();
        if (clientScopes.containsKey(scopeKey)) {
            if (!clientScopes.get(scopeKey).equals(paylad)) {
                throw new AccessDeniedException("insufficient_scope");
            }
        }

        return true;
    }
}
idp 端的 scope 检查实现起来稍微麻烦点,其主要思路是:
- 在 photo-service 向 idp 发起 /oauth/check_oauth 鉴权请求前,添加过滤器,将客户端的请求细节保存到某个全局对象中;
- 替换 photo-service 默认的 tokenServices,在向 idp 发起 /oauth/check_oauth 鉴权请求的过程中,将请求细节附加到请求中;
- idp 在 AuthorizationServerEndpointsConfigurer 中添加自定义 Interceptor,在每次 check token 前先执行 自定义 Interceptor;
- idp 在自定义 Interceptor 中取出请求细节,根据请求细节和 clientDetails 信息(scope),执行 scope 检查。
以上方法,虽然实现麻烦,但是定制性和灵活性很强,不受框架约束,可以适应各种复杂的业务逻辑。
11)资源服务器根据 idp 检验结果(true/false 或其他等效手段)决定是否返回用户相册数据给客户端。如果 token 校验失败则返回 401 给客户端,如果 scope 检查不通过则返回 403。这一步也叫“权限控制”
与鉴权工作中的 scope 范围检查类似,实现权限控制的方法也有两种:
- 授权服务器端的权限控制,属于集中式权限控制;
- 资源服务器端的权限控制,属于分散型权限控制。
其中,授权服务器端的权限控制比较简单,在 idp 工程的 CheckTokenInterceptor.preHandle() 方法中添加权限控制的业务代码即可:
- CheckTokenInterceptor.java
public class CheckTokenInterceptor implements HandlerInterceptor {
    @Override
    public boolean preHandle(HttpServletRequest request, HttpServletResponse response, Object handler) throws Exception {
        ...

        /**
         * 11. [密码模式的典型架构层次和主要流程] 中的第 11 步:
         *  授权服务器短的权限控制,即集中式权限控制
         *
         * 实现更细粒度的权限控制,从某种程度上来说,这个过程也可以称作鉴权
         */
        // 授权服务器端鉴权/权限控制业务的逻辑

        return true;
    }
}
最后来看资源服务器端的权限控制。我们使用 spring-secutity 提供的标准方法来实现:
- 资源服务器端 PreAuthorize hasRole/hasAuthority
- 资源服务器端 PreAuthorize 自定义实现 hasPermission
以上说法在某种程度上也可以理解为鉴权。
首先,我们添加或修改 photo-service 工程的相关代码:
- PhotoController.java
package com.example.demophoto.web;

import org.springframework.security.access.prepost.PreAuthorize;
import org.springframework.web.bind.annotation.GetMapping;
import org.springframework.web.bind.annotation.RequestMapping;
import org.springframework.web.bind.annotation.RestController;

/**
 * 1、 权限控制的两种类型:资源服务端权限控制、授权服务器端权限控制
 * 2、 权限控制的三种方法:
 *      A、 资源服务器端 PreAuthorize hasRole/hasAuthority
 *      B、 资源服务器端 HttpSecurity access 自定义实现 hasPermission
 *      D、 授权服务器端 HandlerInterceptor
 *     以上说法在某种程度上也可以理解为鉴权。
 */
@RestController
@RequestMapping("/api/")
public class PhotoController {
    @GetMapping("/photo")
    @PreAuthorize("hasRole('USER') and hasAuthority('WRITE')")
    public String fetchPhoto() {
        return "GET photo";
    }

    @GetMapping("/photo2")
    public String fetchPhoto2() {
        return "GET photo 2";
    }

    @GetMapping("/photo3")
    @PreAuthorize("hasPermission('PhotoController', 'read')")
    public String fetchPhoto3() {
        return "GET photo 3";
    }
}
- ResourceServerConfigurer.java
@Configuration
@EnableResourceServer
public class ResourceServerConfigurer extends ResourceServerConfigurerAdapter {
    ...

    /**
     * 旧版本的 spring-security-oauth2 还需要将执行 resources.expressionHandler(oAuth2WebSecurityExpressionHandler)
     * 以注入自定义的 expressionHandler,当前及以后版本不需要了
     *
     * @return
     */
    @Bean
    public OAuth2WebSecurityExpressionHandler oAuth2WebSecurityExpressionHandler() {
        OAuth2WebSecurityExpressionHandler oAuth2WebSecurityExpressionHandler = new OAuth2WebSecurityExpressionHandler();

        // 在新版本的 spring-security-oauth2 中,这行代码可以不用,
        // 框架会自动注入 customPermissionEvaluator 替换默认的 DenyAllPermissionEvaluator
        // oAuth2WebSecurityExpressionHandler.setPermissionEvaluator(customPermissionEvaluator);
        return oAuth2WebSecurityExpressionHandler;
    }

    ...
}
- CustomPermissionEvaluator.java
package com.example.demophoto.config.oauth2;

import com.example.demophoto.service.PermisionEvaluatingService;
import org.springframework.security.access.PermissionEvaluator;
import org.springframework.security.core.Authentication;
import org.springframework.stereotype.Component;

import java.io.Serializable;

@Component
public class CustomPermissionEvaluator implements PermissionEvaluator {
    private PermisionEvaluatingService permisionEvaluatingService = new PermisionEvaluatingService();

    @Override
    public boolean hasPermission(Authentication authentication, Object targetDomainObject, Object permission) {
        return permisionEvaluatingService.hasPermission(authentication, targetDomainObject, permission);
    }

    @Override
    public boolean hasPermission(Authentication authentication, Serializable targetId, String targetType, Object permission) {
        return permisionEvaluatingService.hasPermission(authentication, targetId, targetType, permission);
    }
}
- PermisionEvaluatingService.java
package com.example.demophoto.service;

import org.springframework.security.core.Authentication;

import java.io.Serializable;

public class PermisionEvaluatingService {
    public boolean hasPermission(Authentication authentication, Object targetDomainObject, Object permission) {
        // 业务逻辑
        return true;
    }

    public boolean hasPermission(Authentication authentication, Serializable targetId, String targetType, Object permission) {
        // 业务逻辑
        return true;
    }
}
- DemoPhotoApplication.java
@SpringBootApplication
@EnableGlobalMethodSecurity(prePostEnabled = true)  // 开启 hasRole/hasAuthority/hasPermission 支持
public class DemoPhotoApplication {
    ...
}
经过以上配置,当客户端向 photo-service 发起 GET /api/photo3 请求时,将会进入 CustomPermissionEvaluator.hasPermission() 方法进行判断,因此可以实现非常灵活的资源服务器端权限控制。